Dreamweaver

Define a Spry XML data set

Before you can add Spry regions, tables, or lists to an HTML page, you need to identify the data that you want to work with.

Note: If you don’t already have an XML data set to use for testing, the Spry assets available at www.adobe.com/go/learn_dw_spryframework includes several sample data sets.
  1. Select Insert > Spry > Spry XML Data Set.
    You can also click the Spry XML Data 
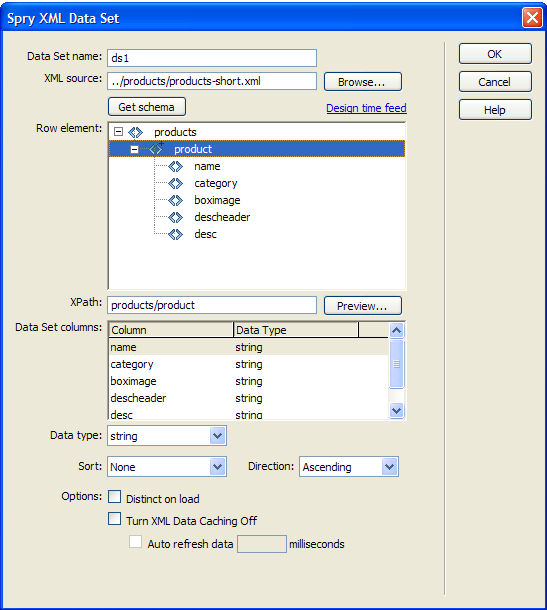
Set button in the Spry category in the Insert bar.
  2. You can accept the “ds1” default Spry Data Set name or you can enter a name that is more meaningful to you.
  3. If you have an XML data file you want to work with, click the Browse button to select it.
  4. If you want to design the page by using a sample feed on your test server, click the Design Time Feed link.
  5. After you have identified the data set to use, click the Get Schema button to populate the Row Elements panel. This panel shows you which elements repeat (marked with a small plus sign “+”) and which are subordinate to others (indented).
  6. In the Row Elements panel, select the element that contains the data you want to display. Typically this is a repeating node, such as <product>, with several subordinate fields, such as <name>, <category>, and <descheader>.
    The Spry XML Data Set dialog box, showing the data nodes.

  7. The XPath text box displays an expression that shows where the chosen node is located in the XML source file. For example, if you use a data set with a schema like the one in the graphic above and then select the <product> repeating node, the XPath text box displays “products/product” to indicate that the data found in the repeating <product> node within the <products> data set should be displayed.
    Note: XPath (XML Path Language) is a syntax for addressing portions of an XML document. It is used mostly as a query language for XML data, just as the SQL language is used to query databases. For more information on XPath, see the XPath language specification on the W3C website at www.w3.org/TR/xpath
  8. To see how your data will look in a browser, click the Preview button. This displays the first twenty rows of your XML data file, with a column for each element.
  9. Sometimes it’s helpful to define a field as a specific type, such as numeric, to allow validation of the data input or to define a specific sort order. If you want to change the data type for any element, select the element in the Data Set Columns panel and choose another value from the Data Type menu.
  10. If you want your data to sort automatically as it loads, select an element from the Sort menu. If you later insert a sortable Spry table with a different sort order, that sort order takes precedence.
  11. Select Ascending or Descending from the Direction menu to indicate the type of sort to perform.
  12. To ensure that there are no duplicate columns, select the Distinct On Load option.
  13. Select the Turn XML Caching Off option if you want to load data directly from the server. By default, the Spry XML data set is loaded to a local cache on the user’s computer to improve performance, but if you have highly dynamic data, there is no advantage to this method.
  14. Select the Auto Refresh Data option and enter a value in milliseconds. If you select this option, the data set automatically refreshes the XML data from the server at the specified interval. This is helpful with data that changes frequently.
  15. Click OK to associate this data set with your page.
Important: When you define a Spry data set, various lines of code are added to your file to identify the Spry assets: the xpath.js and SpryData.js files. Do not remove this code or the Spry data set functions will not work.